You will need BLED112 dongle and pylgbst library.
yum install python3
pip3 install pygatt
pip3 install pexpect
pip3 install https://github.com/undera/pylgbst/archive/1.0.tar.gz
now you can write your first program test.py:
from pylgbst.hub import MoveHub, COLOR_RED
from time import sleep

hub = MoveHub()
hub.led.set_color(COLOR_RED)
sleep(5)
hub.disconnect()
and test it:
python3 test.py
The LED has been changed to red for 5 seconds.
Update: Simpler and newer version: LEGO Boost and Python - CentOS 7.
I've manage to control LEGO Boost using Python.
I've used CentOS 7, BLED112 dongle and pylgbst library.
There are a few command I have to run:
yum install rh-python36
/opt/rh/rh-python36/root/usr/bin/pip install pygatt
/opt/rh/rh-python36/root/usr/bin/pip install https://github.com/undera/pylgbst/archive/0.9.tar.gz
/opt/rh/rh-python36/root/usr/bin/pip install pexpect
now I can run first program (boost1.py):
from pylgbst.movehub import MoveHub

hub = MoveHub()

for device in hub.devices:
    print(device)
using command:
/opt/rh/rh-python36/root/usr/bin/python boost1.py
1
2
55
56
57
50
58
59
60
as you can see, there are list of devices IDs (1, 2, 55, 56, 57, 50, 58, 59, 60).
Let's try to do something (boost2.py):
from pylgbst.movehub import MoveHub, COLOR_RED

hub = MoveHub()

hub.led.set_color(COLOR_RED)
Yes! The LED has been changed to red.
You can control LEGO Power Function using Scrach as you can see on this video.
To achieve this follow these few steps:
- Download S4A (Scratch For Arduino)
- Download modified S4A firmware - 09 S4A LEGO IR Power Function.zip - I found it on this site.
- Optionally: to test if your Arduino board work witch S4A you can check original S4AFirmware.
- Extract files and copy three of them to directory named S4AFirmware14_LEGO_PF_IR:
- S4AFirmware14_LEGO_PF_IR.ino
- PowerFunctions.cpp
- PowerFunctions.h
I've changed pin from D5 to D12 (it depends on hardware)
int IR_pin = 12; // LEGO PF IR channel
- Use Arduino (or similar software) tu compile and upload S4AFirmware14_LEGO_PF_IR.ino (during uploading you have to close S4A because it can interrupt communication)
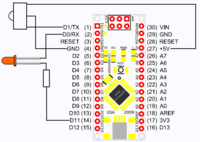
- Connect IR diode to pin (D12 in my case) - I've prepared simple board (in KiCAD) for Arduino Nano
Now You can make your first program:
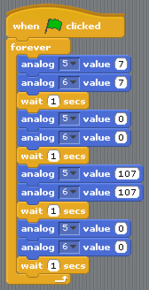
it is a bit tricky: analog 5 mean "RED" channel and analog 6 mean "BLUE" one, values are
- 0 - float
- 1-7 forward (1-low, 7-fast)
- 100 - break
- 101-107 - reverse (101-low, 107-fast)
So this program does: FWD, wait 1s, Stop, wait 1s, REV, wait 1s, Stop, wait 1s for both channels/engines
Have fun!
If you would like to use original LEGO MindStorms Robotics Invention System simple transceiver won't be enough.
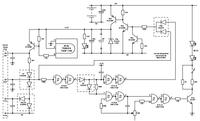
I've found schematic on eurobricks forum - it looks you have to emulate CTS signal also.
My copy of this circuit:
You can find this schematic also on other pages (ie. LEGO MINDSTORMS Internals).
I have a very old Lego RCX 1.0 but I couldn't program it. I supposed it was because of incompatibility, virtualized XP, or not supported USB<->RS232. I decided to build "new" tower. First I tried to use project from robotics.sk based on 555 timer, but all these capacitors, potentiometers and oscilloscope to calibrate... hello it's XXI century we have microcontrollers everywhere.
I've used arduino nano (some clone) only to generate 38kHz signal - based on comment in PWM at 38KHZ with Arduino article.
The IR receiver pinout is from TSOP4838 (GND in the middle) not TSOP1238 (Vs in the middle).
The whole program looks like this:
#define IR_CLOCK_RATE    38000L
#define pwmPin      11   // IR Carrier

void setup()  {
  // toggle on compare, clk/1
  TCCR2A = _BV(WGM21) | _BV(COM2A0);
  TCCR2B = _BV(CS20);
  // 36kHz carrier/timer
  OCR2A = (F_CPU/(IR_CLOCK_RATE*2L)-1);
  pinMode(pwmPin, OUTPUT);
}

void loop()  {
}
Now I wanted to check if it works with my RCX birck, so I've downloaded Bricx Command Center 3.3 and installed it based on Programming Lego Robots using NQC tutorial.
Next I founded firm0328.lgo file, the RCX firmware version 3.28. It is one version for RCX 1.0, 1.1 and 2.0. You can google for it or check this sites:
- http://neuron.eng.wayne.edu/LEGO_ROBOTICS/software_setup_tutorial.html
- http://pbrick.info/rcx-firmware/
- http://www.philohome.com/sdk25/sdk25.htm
This file is need when you lost power (ie. change batteries) - you can do this (based on bricxcc) using Tools -> Download firmware. It takes some time.
Now I was able to program and control my RCX brick again.
Python jest wszędzie. Ostatnio znalazłem metodę na komunikację z RCX (pierwszy z serii LEGO Mindstorms) pracującego z LegOS (obecnie pod nazwą brickOS) za pomocą biblioteki Pylnp. Chyba muszę odkurzyć RCX'a ;-)


Add comment