Install kubectl:
cat <<EOF > /etc/yum.repos.d/kubernetes.repo
[kubernetes]
name=Kubernetes
baseurl=https://packages.cloud.google.com/yum/repos/kubernetes-el7-x86_64
enabled=1
gpgcheck=1
repo_gpgcheck=1
gpgkey=https://packages.cloud.google.com/yum/doc/yum-key.gpg https://packages.cloud.google.com/yum/doc/rpm-package-key.gpg
EOF
yum install -y kubectl
Install Minikube:
curl -LO https://storage.googleapis.com/minikube/releases/latest/minikube-linux-amd64
install minikube-linux-amd64 /usr/local/bin/minikube
It copy file minikube-linux-amd64 to /usr/local/bin/minikube.
Install docker:
curl -fsSL https://get.docker.com -o get-docker.sh
bash get-docker.sh
downgrade to supported version:
yum remove docker-ce docker-ce-cli
yum install docker-ce-18.06.1.ce
systemctl enable docker
systemctl start docker
Set hostname
You have to have name minikube be resolved to your IP:
hostname minikube
Optional
Install conntrack:
yum install conntrack
Installing crictl:
VERSION="v1.12.0"
curl -LO https://github.com/kubernetes-sigs/cri-tools/releases/download/$VERSION/crictl-$VERSION-linux-amd64.tar.gz
tar zxvf crictl-$VERSION-linux-amd64.tar.gz -C /usr/local/bin
rm -f crictl-$VERSION-linux-amd64.tar.gz
Recomended settings:
iptables -I INPUT -p tcp --dport 8443 -j ACCEPT
iptables -I INPUT -p tcp --dport 10250 -j ACCEPT
swapoff -av
The main command:
minikube --vm-driver=none start
you should get something like this:
Starting local Kubernetes v1.10.0 cluster...
Starting VM...
Getting VM IP address...
Moving files into cluster...
Downloading kubelet v1.10.0
Downloading kubeadm v1.10.0
Finished Downloading kubeadm v1.10.0
Finished Downloading kubelet v1.10.0
Setting up certs...
Connecting to cluster...
Setting up kubeconfig...
Starting cluster components...
Kubectl is now configured to use the cluster.
===================
WARNING: IT IS RECOMMENDED NOT TO RUN THE NONE DRIVER ON PERSONAL WORKSTATIONS
        The 'none' driver will run an insecure kubernetes apiserver as root that may leave the host vulnerable to CSRF attacks

When using the none driver, the kubectl config and credentials generated will be root owned and will appear in the root home directory.
You will need to move the files to the appropriate location and then set the correct permissions.  An example of this is below:

        sudo mv /root/.kube $HOME/.kube # this will write over any previous configuration
        sudo chown -R $USER $HOME/.kube
        sudo chgrp -R $USER $HOME/.kube

        sudo mv /root/.minikube $HOME/.minikube # this will write over any previous configuration
        sudo chown -R $USER $HOME/.minikube
        sudo chgrp -R $USER $HOME/.minikube

This can also be done automatically by setting the env var CHANGE_MINIKUBE_NONE_USER=true
Loading cached images from config file.
Launch first pod:
kubectl run hello-minikube --image=k8s.gcr.io/echoserver:1.10 --port=8080
kubectl run --generator=deployment/apps.v1beta1 is DEPRECATED and will be removed in a future version. Use kubectl create instead.
deployment.apps/hello-minikube created

kubectl expose deployment hello-minikube --type=NodePort
service/hello-minikube exposed
check if it works:
kubectl get pod
NAME                              READY   STATUS    RESTARTS   AGE
hello-minikube-7c77b68cff-677z8   1/1     Running   0          3m
you can also check ip or service url:
minikube ip
minikube service hello-minikube --url
when you check that it works (using browser/wget/culr) you can cleanup:
kubectl delete services hello-minikube
kubectl delete deployment hello-minikube
but what is it for...?
I've upgraded Pi-hole do 4.0 version:
docker run -d --name pihole-4.0.0-1 \
           --dns 127.0.0.1 --dns 1.1.1.1 \
           -e ServerIP=192.168.1.28 -e DNS1=192.168.1.4 \
           -e WEBPASSWORD=secret \
           -p 8018:80 -p 53:53 -p 53:53/udp \
           --restart=unless-stopped \
           pihole/pihole:4.0.0-1
as you can see I use new name (pihole/pihole), set power policy and additional --dns option - it's necessary.
Last time I've to manually edit /etc/resolve.conf inside container - this is simple workaround.
There is easy way to control lights using PIR (Passive Infra Red) it looks like this:

As usually message from MQTT broker is translated to JSON, then I use switch to filter-out message from PIR (in my case AA0446). I sent "On" and 5 minutes later "Off" to template
{
  "idx" : 25,
  "command" : "switchlight",
  "switchcmd" : "{{payload}}"
}
Finally full message is sent to domoticz/in topic.
Complete code.
How to switch light using 3 channels 433MHz switch. It's very simple:
1 RF signal
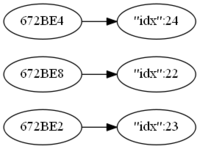
My 3 button 433MHz switch sends 3 codes:
- 672BE2- left button
- 672BE8 - center button
- 672BE4 - right button
2 MQTT publish
I set up RF Bridge to send MQTT messages like this (center button):
{
  "RfReceived" : {
    "Sync" : 7840,
    "Low" : 250,
    "High" : 780,
    "Data" : "672BE8",
    "RfKey" : "None"
  }
}
to topic:
tele/DVES_B2EFB9/RESULT
Domoticz needs to get mesage with topic:
domoticz/in
with payload like this:
{
  "idx" : 22,
  "command" : "switchlight",
  "switchcmd" : "Toggle"
}
We need to translate:

3, 4 and 5 message translation
Mosquitto and Node-RED are deployed using Docker on same machine:
docker run -it -p 1883:1883 -p 9001:9001 --name mosquitto \
-v mosquitto:/mosquitto/config -v mosquitto:/mosquitto/data \
-v mosquitto:/mosquitto/log eclipse-mosquitto

docker run -d -p 1880:1880 --restart=always  \
--log-opt max-size=10m --log-opt max-file=5 \
-v node-red-data:/data --name nodered \
--link mosquitto:broker nodered/node-red-docker:slim
You can see that I've link mosquitto container as broker.
The switch node splits messages depending on msg.payload.RfReceived.Data, and change node set properties (idx, command and switchcmd)

Here you have complete Node-RED code.
Finally Domoticz tuns the light!
Of course you have to have set up Domoticz first.
To change start page I've added in site.ini.append.php file in SiteSettings section:
[SiteSettings]
IndexPage=/content/view/full/134/
DefaultPage=/content/view/full/134/
If you don't have Linux station an you would like to debug some application witch syslog you can use Visual Syslog Server for Windows.
It's quite useful application that can emulate real syslog server.
You can show logs in realtime with filtering capabilities.
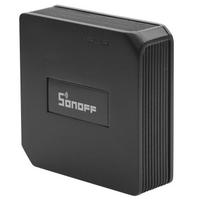
Recently I've found interesting device - it is WiFi to 433MHz gateway.
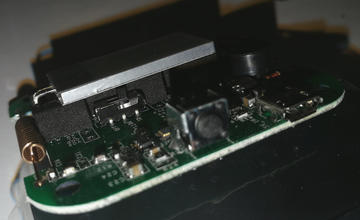
I've used FlashESP8266 to flash sonoff.bin (6.2.1).
Connect 3.3V USB-RS232 interface to J2 (you won't need 5th - SDA - pin).
To program you have to set S2 switch to OFF position.
As You can see it is in ON (normal) position.
Future reading:
- Sonoff RF Bridge w/ MQTT & Home Assistant
- thehackbox.org/tasmota
- Modified External GPIO Jack for Sonoff RF Bridge R2
- OpenMQTTGateway
Three chanel 433MHz relays - it uses specific protocol:
To backup running QEMU/KVM machine I use script made by Daniel Berteaud. I've installed it in this way:
cd /usr/local/sbin/
wget "http://gitweb.firewall-services.com/?p=virt-backup;a=blob_plain;f=virt-backup;hb=HEAD" -O virt-backup-0.2.17-1.pl
ln -s virt-backup-0.2.17-1.pl virt-backup
chmod u+x virt-backup-0.2.17-1.pl
as you can see current version is 0.2.17-1
There is also a fork of virt-backup: github.com/vazhnov/virt-backup.pl - it's based on some earlier version.
Example command to backup centos-test machine (name shown by virsh list) to /mnt/backups directory.
virt-backup --action=dump --no-snapshot --compress --shutdown --shutdown-timeout=300 --vm=centos-test --backupdir=/mnt/backups
I would like to have light with switch (it should work even without domoticz) but I would like to use power of domoticz also ;-)
In ESP (ESP6) I've devices:
- Switch input:
- name: button
- IDX: 25
- 1st GPIO: GPIO16
- Pull UP: set
- Inversed: not set
- Switch Type: Switch
- Switch Button Type: Push Button Active Low
- Send Boot state: not set (you can set it if you want)
- Send Data: set
- Switch input
- name: okno
- IDX: 23
- 1st GPIO: GPIO16
- Pull UP: set
- Inversed: set
- Switch Type: Input
- Switch Button Type: Normal Switch
- Send Boot state: not set (you can set it if you want)
- Send Data: set
- Switch input
- name: zlew
- IDX: 24
- 1st GPIO: GPIO12
- Pull UP: set
- Inversed: set
- Switch Type: Input
- Switch Button Type: Normal Switch
- Send Boot state: not set (you can set it if you want)
- Send Data: set
In domoticz I've three "On/off" switches:
- "ESP6-okno"
- IDX: 23
- On Action: http://esp6.lan/tools?cmd=GPIO,14,0
- Off Action: http://esp6.lan/tools?cmd=GPIO,14,1
- "ESP6-zlew"
- IDX: 24
- On Action: http://esp6.lan/tools?cmd=GPIO,12,0
- Off Action: http://esp6.lan/tools?cmd=GPIO,12,1
- "ESP6-both"
- IDX: 25
- On Action: http://esp6.lan/control?cmd=event,zapal
- Off Action: http://esp6.lan/control?cmd=event,zgas
ESPeasy Rules:
On button#Switch do
  if [button#Switch]=0.00
    event zgas
  else
    event zapal
  endif
endon

on zapal do
  gpio,12,0
  gpio,14,0
endon

on zgas do
  gpio,12,1
  gpio,14,1
endon
As you can see when ESP6-both is changed I call "rules" from ESP
You can read more about rules in Rules Tutorial.
If you forgot to set-up power policy during container creation you can easy modify it:
docker update --restart=always my-container
you can check it:
docker@docker:~$ docker inspect my-container | grep -A3 "RestartPolicy"
            "RestartPolicy": {
                "Name": "always",
                "MaximumRetryCount": 0
}, 


Add comment